Tuesday, June 21, 2011

Welcome to the family, Atlas

You already know we are dog people. Our two furry kids, Jack & Rory pretty much take over our lives. (and I'm actually pretty surprised that I haven't written more about them here...)

proof that for 5 seconds, Rory was smaller than Jack

We got Rory as a puppy and have experienced just about every problem you can face with a little wall-chewing, turkey-eating, fur ball running around under your feet! But we've also loved every minute of her growing up. We're cheesy like that.
she's a goof. a BIG goof. and we love her.

We're also huge suckers for the huge puppers. Big dogs make us drool. But, since they can easily (and literally) eat you out of house and home, we can't commit to buying another one just yet. Instead, we decided to start working with a giant dog rescue called Big Dogs, Huge Paws. They are based in Colorado but are quickly expanding to Texas. We decided that we really wanted to be a foster home to dogs that had nowhere else to go. These gentle giants just need a place to live while they try to find their forever home. We went through the foster approval process and were finally matched with a dog...

Everyone, meet Atlas:
just chillin out max and relaxin all cool (don't mind the dead grass)

She is an 8 year old Brazilian Mastiff, weighing in at 101 pounds. Oh, she may look like a grumpy old lady (and she can be sometimes) but really she's a sweetheart looking for a new family. Her family had to move over seas and couldn't take her with them. Sad deal.

We got her at the end of May. Literally the DAY before my family arrived. So if I wasn't already in a full on, last minute finish-projects-clean-house-get-groceries-do-yardwork frenzy, I was now. Luckily we knew it was a possibility, so our house was all foster-ready. (more on the total house re-arranging coming soon!) Surprisingly we made it through the family visit just fine (although my family chose to rename her Alice) and have gotten in to a good groove ever since.

Here is how Atlas spends most of her time:
Sleeping on her bed with her toys. And snoring. Did I mention she snores? Loud. But I guess you can get away with that when you're old. I'll let it slide.

What about you? Looking for a Big Dog of your own? Check out BDHP and take a look at the dogs they have up for adoption... you might find yourself a new forever friend! http://bigdogshugepaws.com/

Monday, June 20, 2011

My friend the armadillo

While catching up on some Young House Love, I was inspired by Sherry's post on faking ceramic animals. She loves collecting white ceramic animals (awesome) but she shared a secret-- they're not all real ceramic! Oh, the power of white spray paint!

She took this $1.99 frog from goodwill:

and made it this!
(pictures from Young House Love)

Genius, right? In one of those "why didn't I think of that?" kind of ways. So ever since I saw that post, I have been on the search for a cool ceramic animal that I can spray paint and add to my own home decor.

That's when I came across this little gem:

A horribly ugly brown/yellow/gold armadillo! Every Texas home needs an armadillo, right? Right. So I bought it. I'm pretty sure it was also right around the $1.99 range. So away he came, to a yard and some spray paint! Look at him, just ready to be made over!
I decided to go with Rust-oleum Gloss Pure White spray paint. It said it was good for all surfaces, so I figured it would work well on the ceramic surface.
After several coats on the top and bottom, the little guy was completely covered, and completely transformed!
Unfortunately, after the first coat of paint, I noticed a crack along his back that had previously been disguised by the hideous color pattern. This was pretty easily fixed with another coat of paint, as it filled in fairly nicely. Plus, it's on the back, so you don't notice it much at all (unless you're looking for it- which you all will now!)
But now that he's all happy white, he sits comfortably in his new home. And I'm in love. And my house feels a bit more classy Texas.
Hey, good lookin. What's cookin?


Thursday, June 16, 2011

Gourmet on the Go

Do you ever wake up and wish you had a Starbucks in the kitchen? Someone waiting there for you with a scone and an iced coffee? Well I do.

But now, thanks to these amazing premade scones, I can have it all!
My friend bought them for me at Central Market and she said they have blueberry and cinnamon. They are just like Pillsbury biscuits that you open, plop on a baking sheet, pop in the oven, and BAM! they're done before you blow dry your hair!

Pair that up with a flavored coffee poured over ice, and I feel like I just went through the drive thru in my kitchen!
Cheers to a good start!

Tuesday, June 14, 2011

Lamp Re-Do

My favorite lamp had an accident. It wasn't his fault, but his shade just couldn't take the pressure (or the gravity) and it fell free from the frame. Poor shade.

Look how sad it looks:
Pitiful. The top frame is what secures the shade to the lamp itself, so without it attached to the shade, there is just no hope. Of course the sane person would just buy a new shade. They're cheap, right?

But not this girl. Mostly because I couldn't find one in the shape I liked, but also because I just love a crafting challenge! I was inspired by this post at Young House Love and decided to go for it and recover the lamp shade. I found a piece of the perfect brown fabric in the remnants basket at Jo Anne, and we were all set to get going...

So I started with the frame and reconnected it to the shade.

I simply used masking tape because I didn't have to worry about it being too strong. I was going to hot glue the fabric over it and that would hold it together just fine.
After several strips of tape around the top, the frame was securely re-attached. (I feel I should mention here that this lamp is purely decorative. I never actually use it because my bedroom has plenty of overhead light from my ceiling fan. Additionally, the fabric I chose is fairly dark, so this strategy may not be perfect if there was light actually shining through the shade. The tape may or may not create shadows, depending on your fabric choice)
After I secured the frame to the shade, I began attaching my fabric. I started by running a line of hot glue down the seam on the shade, and placed the fabric on it quickly and smoothly.
Once the fabric was attached at the seam, I pulled it taught all the way around and hot glued along the top edge first. My problem was that this shade was not perfectly tubular. It was slightly angled, so the fabric wouldn't lay tight and smooth. I had to slightly pucker/pleat the fabric along the way. As you can see, by the time I made it all the way around, the layers weren't lining up perfectly anymore. It's OK in this situation because there is no pattern, but if you are working with a pattern you'll want to be more careful.

After it was laid out all around, I secured the inside frame edges with another line of hot glue.
(I should preface here, that this project would have been MUCH easier if I would have had Handy Man help me hold the fabric in place. But I was too excited to get it done and didn't want to wait for him!)
After it was glued down I trimmed the excess around the edges. The fabric I used was not ideal, as it frayed a bit when you cut it. So I left a larger edge than normal, in case it starts to fray.
Again, since this is a decorative lamp, and not exactly a functional light source, the inside seams don't have to be perfect. But I'm sure I could have done a better job trimming it than this:
Ideally I would clean it up and/or add a finished strip along the inside of the shade, but I didn't want to take the time. It looks fine from a distance, and that's all that matters for a fake-on-the-dresser-just-because-it-looks-good lamp. Check it:
I think it works well! And it didn't take long at all. Those are the kinds of projects I can get behind!

Empty Frame Gallery Wall

One of the projects I tackled over the last few months was the big blank wall in my guest room. This room is decorated in black and white and includes my (embarrassingly) extensive collection of Scottish Terrier figurines.

The bed in this room is my old twin bed from growing up. When I had it, it was white with brass, but it was painted black when it was passed down to my brothers. Now it goes perfectly with the style and decor of this room.

The only problem was this big, blank wall. First of all, the twin bed is off-center. That means that I can't really hang one large item over the bed or else the whole room will look lopsided. So I decided to use a recent design trend and create an empty frame wall.

So I started with this blank canvas and a variety of frames. I have been collecting assorted frames from thrift stores and the Hobby Lobby clearance section for a while. They were all different colors, so I gave them a quick coat of black paint, and "Ta Da"- they match!

Of course, I got ahead of myself and put them on the wall before I painted them all... I couldn't wait to see the layout! So the rest of the pictures show them in their original colors.

To start, I used a tip I saw somewhere online (probably from the Queen Martha Stewart or someone) and used a huge piece of white craft paper to lay out the design I liked. I simply measured my space on the wall, cut a matching piece of paper, spread the paper on the floor and laid out the frames how I would like to see them on the wall.
After they were laid out the way I like them, I traced them on to the paper. I was then left with these outlines:
Can you see them? I should have done them in marker so you could see them! But you get the idea...

After having my Handy Man put some frame holders on the back (he's way better at measuring than me!) I was ready to hang them on the wall.

I simply hung the paper on the wall using thumb tacks, and used the outlines as my guideline for where to put the nails for each picture hanger.
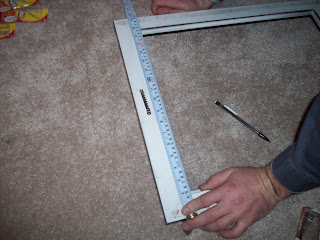
Is this angle better? I really should have used markers!

After you measure the picture hangers and figure out where the nail holes go, just nail them right over the paper. Then hang the frames to make sure they lay directly over your original outline.
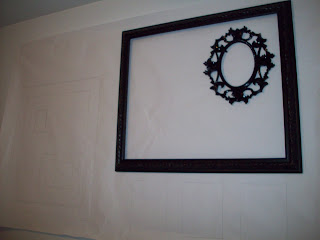
Once all your nail holes are done, you can remove the paper and put all the frames in place. Here is what my wall looked like halfway through, before I painted all the frames and added a few more.
Here it is now. I still consider it a work in progress, as I can keep adding frames to fill the whole wall if I want. I really like adding the few little touches to the frames to make them more interesting.
I especially like the book I hung with a plate hanger. Super easy and a great way to display a collectible book! This would be so cute in a kids room!

So now the black and white room is a little more complete. Take that off the list! (or at least mark it "half done")