Showing posts with label crafting. Show all posts

Tuesday, August 2, 2011

Quick Table Re-Do

One of my major recent projects involved rearranging my house to accommodate a new giant crate for this girl. With a huge crate taking over my small dining room space, I was left with an empty corner and awkward space.
why hello ginormous crate. thanks for coming in and taking over everything

oh no, I didn't want a dining room there. go ahead, it's all yours.

I decided to re-purpose the space and add a new seating area. I wanted to find a chair and a small side table that I could refinish to add some character to the room. The problem? I wanted to do it all before my parents came to visit... which gave me approximately two weeks to find a chair and a table on the cheap, refinish them, and re-decorate the space. No biggie, right?

Enter thrift store marathon. I literally visited every thrift store within a 20 mile radius multiple times, and I had Craigslist on lock-down. It was rare if I went more than a few hours without checking for a table or a chair online, each under $20. (thank you, Craigslist for iPhone!)

Well, luck was on my side. After a few stops, I found this beauty for only $4 at a thrift store!
She wasn't all that pretty, and she definitely needed to freshen up, but I knew that a quick coat of paint would do the trick!

And Ta-Da! It did! I sanded her down and coated her with two coats of spray paint, and she was done.
I am not a professional re-finisher (as I will prove when I show my chair re-do) so I know I didn't do this the correct way. I should have primed it first, and I probably should have done a clear coat or seal too. But I like to live on the edge. And by edge, I mean the edge of laziness mixed with "is this really necessary?"

But she still looks great. I paired her up with my new found chair (story on that coming soon) and we were set to impress.
Look- she even made a happy home for Mr. Armadillo! Don't they go so well together?
A happy table, a happy armadillo, and a happy awkward corner. Perfecto.

p.s. more pictures of the before and after space to come...

Monday, June 20, 2011

My friend the armadillo

While catching up on some Young House Love, I was inspired by Sherry's post on faking ceramic animals. She loves collecting white ceramic animals (awesome) but she shared a secret-- they're not all real ceramic! Oh, the power of white spray paint!

She took this $1.99 frog from goodwill:

and made it this!
(pictures from Young House Love)

Genius, right? In one of those "why didn't I think of that?" kind of ways. So ever since I saw that post, I have been on the search for a cool ceramic animal that I can spray paint and add to my own home decor.

That's when I came across this little gem:

A horribly ugly brown/yellow/gold armadillo! Every Texas home needs an armadillo, right? Right. So I bought it. I'm pretty sure it was also right around the $1.99 range. So away he came, to a yard and some spray paint! Look at him, just ready to be made over!
I decided to go with Rust-oleum Gloss Pure White spray paint. It said it was good for all surfaces, so I figured it would work well on the ceramic surface.
After several coats on the top and bottom, the little guy was completely covered, and completely transformed!
Unfortunately, after the first coat of paint, I noticed a crack along his back that had previously been disguised by the hideous color pattern. This was pretty easily fixed with another coat of paint, as it filled in fairly nicely. Plus, it's on the back, so you don't notice it much at all (unless you're looking for it- which you all will now!)
But now that he's all happy white, he sits comfortably in his new home. And I'm in love. And my house feels a bit more classy Texas.
Hey, good lookin. What's cookin?


Tuesday, June 14, 2011

Lamp Re-Do

My favorite lamp had an accident. It wasn't his fault, but his shade just couldn't take the pressure (or the gravity) and it fell free from the frame. Poor shade.

Look how sad it looks:
Pitiful. The top frame is what secures the shade to the lamp itself, so without it attached to the shade, there is just no hope. Of course the sane person would just buy a new shade. They're cheap, right?

But not this girl. Mostly because I couldn't find one in the shape I liked, but also because I just love a crafting challenge! I was inspired by this post at Young House Love and decided to go for it and recover the lamp shade. I found a piece of the perfect brown fabric in the remnants basket at Jo Anne, and we were all set to get going...

So I started with the frame and reconnected it to the shade.

I simply used masking tape because I didn't have to worry about it being too strong. I was going to hot glue the fabric over it and that would hold it together just fine.
After several strips of tape around the top, the frame was securely re-attached. (I feel I should mention here that this lamp is purely decorative. I never actually use it because my bedroom has plenty of overhead light from my ceiling fan. Additionally, the fabric I chose is fairly dark, so this strategy may not be perfect if there was light actually shining through the shade. The tape may or may not create shadows, depending on your fabric choice)
After I secured the frame to the shade, I began attaching my fabric. I started by running a line of hot glue down the seam on the shade, and placed the fabric on it quickly and smoothly.
Once the fabric was attached at the seam, I pulled it taught all the way around and hot glued along the top edge first. My problem was that this shade was not perfectly tubular. It was slightly angled, so the fabric wouldn't lay tight and smooth. I had to slightly pucker/pleat the fabric along the way. As you can see, by the time I made it all the way around, the layers weren't lining up perfectly anymore. It's OK in this situation because there is no pattern, but if you are working with a pattern you'll want to be more careful.

After it was laid out all around, I secured the inside frame edges with another line of hot glue.
(I should preface here, that this project would have been MUCH easier if I would have had Handy Man help me hold the fabric in place. But I was too excited to get it done and didn't want to wait for him!)
After it was glued down I trimmed the excess around the edges. The fabric I used was not ideal, as it frayed a bit when you cut it. So I left a larger edge than normal, in case it starts to fray.
Again, since this is a decorative lamp, and not exactly a functional light source, the inside seams don't have to be perfect. But I'm sure I could have done a better job trimming it than this:
Ideally I would clean it up and/or add a finished strip along the inside of the shade, but I didn't want to take the time. It looks fine from a distance, and that's all that matters for a fake-on-the-dresser-just-because-it-looks-good lamp. Check it:
I think it works well! And it didn't take long at all. Those are the kinds of projects I can get behind!

Empty Frame Gallery Wall

One of the projects I tackled over the last few months was the big blank wall in my guest room. This room is decorated in black and white and includes my (embarrassingly) extensive collection of Scottish Terrier figurines.

The bed in this room is my old twin bed from growing up. When I had it, it was white with brass, but it was painted black when it was passed down to my brothers. Now it goes perfectly with the style and decor of this room.

The only problem was this big, blank wall. First of all, the twin bed is off-center. That means that I can't really hang one large item over the bed or else the whole room will look lopsided. So I decided to use a recent design trend and create an empty frame wall.

So I started with this blank canvas and a variety of frames. I have been collecting assorted frames from thrift stores and the Hobby Lobby clearance section for a while. They were all different colors, so I gave them a quick coat of black paint, and "Ta Da"- they match!

Of course, I got ahead of myself and put them on the wall before I painted them all... I couldn't wait to see the layout! So the rest of the pictures show them in their original colors.

To start, I used a tip I saw somewhere online (probably from the Queen Martha Stewart or someone) and used a huge piece of white craft paper to lay out the design I liked. I simply measured my space on the wall, cut a matching piece of paper, spread the paper on the floor and laid out the frames how I would like to see them on the wall.
After they were laid out the way I like them, I traced them on to the paper. I was then left with these outlines:
Can you see them? I should have done them in marker so you could see them! But you get the idea...

After having my Handy Man put some frame holders on the back (he's way better at measuring than me!) I was ready to hang them on the wall.

I simply hung the paper on the wall using thumb tacks, and used the outlines as my guideline for where to put the nails for each picture hanger.
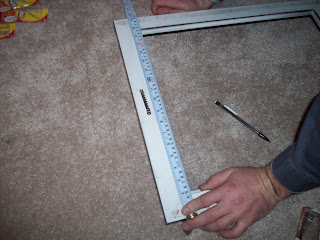
Is this angle better? I really should have used markers!

After you measure the picture hangers and figure out where the nail holes go, just nail them right over the paper. Then hang the frames to make sure they lay directly over your original outline.
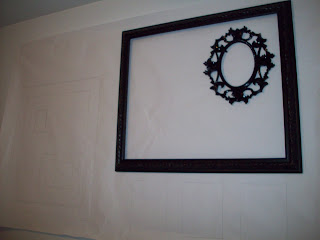
Once all your nail holes are done, you can remove the paper and put all the frames in place. Here is what my wall looked like halfway through, before I painted all the frames and added a few more.
Here it is now. I still consider it a work in progress, as I can keep adding frames to fill the whole wall if I want. I really like adding the few little touches to the frames to make them more interesting.
I especially like the book I hung with a plate hanger. Super easy and a great way to display a collectible book! This would be so cute in a kids room!

So now the black and white room is a little more complete. Take that off the list! (or at least mark it "half done")

Monday, May 9, 2011

Spring has Sprung

While I was away from the blog, I completed a lot of projects. I'm going to try uploading a bunch of them now that we're back and running, but they may seem a little out of order. Since there has been a back log since St. Patrick's Day, I hope you'll stick with me if I seem to jump from here to there!

First up is the centerpiece I created for Spring/Easter. I used things from the Dollar Tree and the Target Dollar Bins to put together this super cute Spring display:

I bought the basket at a thrift store for $1.99 and filled it with floral foam from the Dollar Tree:

I even left it wrapped in the plastic packaging to keep the mess under control (floral foam sometimes tends to fall apart pretty easily when not wet). I used three rectangles for this size basket, cutting one in half to fill the two ends.

I found these cute bird houses in the Target Dollar Bins. They are supposed to be decorative plant stakes for your potted flowers, but they work great for this project! Just stick them right in to the foam:

Along with the floral foam, I also picked up some flowers and birds. These came in a three pack, so you get even more bang for your buck.

After sticking the flowers and birds in the foam, I covered the entire surface with floral moss (bought at Dollar Tree). I didn't glue it down, but it would probably be a good idea if you want to save this for future seasons.

When it's all done, it looks so cute! I put it on my seasonal dresser display in the living room, but it would also be cute as a centerpiece or on a mantle!

I also found this square picket-fence box at the thrift store and used the extra plant stakes to create a second display for my other table. I can't decide which one I like more- the basket or the picket fence! Good thing I can display both!


(P.S. Sorry about the poor picture quality! A new camera is at the top of my wish list!!)

(P.P.S. I don't think these items are available in the Target bins anymore so I'm sorry if I just inspired you to create something that you can't... but just wait until next year! Now as soon as you see them pop up in the bins, you'll already have a plan of what to make!)

Tuesday, March 8, 2011

Quickie Craft, St. Pat's Style

Here is a quick and cheap little St. Patrick's Day project for all of you non-crafters...

I found these super cute bamboo placemats at Dollar Tree. They would be super cute on a table alone, but I wanted to do something a little different...

So I bought several of them and used the non-crafters key to success: Duct Tape. I taped together four of them to create a table runner. They line up right next to each other making them easy to connect:
And that's it! Now I have a cute table runner and it only cost $4! Another cheap score!


Now what to put on top of that table...???

Wednesday, March 2, 2011

St. Patrick's Day Wreath

After putting a hook on my door at Christmas, I've found myself wanting to put a wreath up for every holiday!

This month I obviously wanted to Go Green and make a festive St Patrick's Day wreath. I found everything I needed at the thrift store and the whole project only cost me $5!


I started with a stack of assorted green t-shirts, all priced at 50 cents-$1.99 each.


I also found a couple of wreath forms that were 50% off 99 cents! Score! I bought 2, but only used one for this project. I'll save the other for next month! (Notice the background- yes, I did this project in a laundry basket to minimize the straw that would end up all over the floor!)
I started cutting each t-shirt along the bottom hem and continued to cut it into one long 1 inch strip, all the way up to the sleeves.

Keep cutting until you have a pile of green strips! (this is after two of the four shirts I used)
After I cut up each shirt, I took the strips and cut them into manageable lengths, approximately two arm spans long. I'd say cutting them in to 4 foot strips would be perfect.

I used a straight pin to hold the first four strips on to the wreath. After pinning them down, start randomly wrapping them around the wreath, alternating directions and colors.

When you reach the end of your first strip, pin it to the wreath form to hold it in place. After the first few strips are pinned down, the rest of the strips can be tucked under existing strips and no more pins are needed.
Continue wrapping and alternating until the entire wreath is covered and the colors are the way you like it.


I like the way this looks, but I thought it needed a little something else, so I traced out a shamrock on one of the shirt scraps to add some flair.

I laid out the shamrock and started lining the edge with hot glue. I twisted the extra strips and glued them along the edges (yikes! flash wash out!)

After making it all the way around the shamrock I filled in the remaining sections with smal twists of fabric

Once it was done I pinned it to the wreath and it was ready to hang!


Of course it was dark out when I finished, but I had to hang it and get pictures right away! I was so pleased with the final product and happy that it was so easy and cheap!

Total cost:
wreath form: $ .50
t-shirts: $2.00
$ .50
$1.00
$1.00
Total: $5.00
Sweet!


Linking up:
Visit thecsiproject.com