Now that I have a big yard I have finally decided to do something I've always wanted to do: grow a vegetable garden. (woo hoo, I live an exciting life!) I researched different ways to grow veggies and decided that due to the horrible condition of the dirt in my yard (i.e. clay mixed with sand), plus Rory's habit of uprooting all my plants that are planted in her reach, I needed to go with a raised and fenced plant bed.
I also did some research and found a method that I thought sounded easy to follow and would almost certainly make me successful: Square Foot Gardening. It's a way of separating your flower bed to make it the most efficient it can be. Since I'm all about helping these veggies reach their full potential, I thought it was a fit. So now I'm writing this post in hopes of helping anyone else out there who plans to create a similar full-potential veggie masterpiece.
So here is what I started with:
 (2) 8-foot 2x6 boards (for the raised bed itself)
(6) 4-foot pieces of wood trim (for the grid lines)
Roll of weed barrier cloth (for the bottom)
Assorted bags of peat moss, potting soil, compost, and vermiculite (for "Mel's Mix")
Veggies (not pictured, but purchased at Dallas Farmer's Market for a steal!)
I also started with this:
 That would be the remnants of my first attempt at composting, destroyed by the one and only Rory. It consists of chicken wire and metal corner posts, twisted into a disastrous mess of metal. This (after some untangling) will surround the bed when it's done.
I started by cutting my 2x6 boards in half, giving me 4 4-foot boards for the bed. I then stacked them and pre-drilled holes for the screws to connect them. I saw this tip online to stack the boards and let the top one stick out further than the rest to allow you to drill through it. Then you just kneel on the pile to hold them all in place while you drill. That little tip made it much easier to do this drilling/screwing thing by myself.
 Notice the kneeling whilst drilling and also simultaneously taking a self-portrait? That's what we call multi-tasking my friends! (because yes- I did this entire project alone. Construction and all. Go me.)
 After all holes were pre-drilled, I screwed the boards together to make a square. Alternate your ends so that the equal sized boards all fit together.
 Bonus- here's another "How do I do this by myself?" trick... At first I was struggling screwing in the screws to the board and trying to hold the boards at the same time. Then I moved over to my patio, put the board facing out (straight ahead in the picture below) against my concrete step, lined up the board from the side (facing the left in the picture below) on the end, and then screwed in from there. The pressure of me pushing the drill into the wood pushed the main board against my step and I was able to focus only on holding the other board to make a right angle. Easy peasy. (but of course I didn't take a picture of it. But you can figure it out)
 Once all boards were screwed together, I had this frame:
  Score. But see all those weeds poking through from below? Not gonna happen. So I covered the bottom with weed barrier and stapled it to the edges so that it wouldn't move.
 Take that weeds.
 After placing the box where I wanted it, I filled it with "Mel's Mix" of 1/3 peat moss, 1/3 compost, and 1/3 vermiculite. This mix is said to keep nutrient-rich forever and make your plants bloom amazingly. So there ya go, veggies. Nothing but the best for you.
 After placing the box where I wanted it, I filled it with "Mel's Mix" of 1/3 peat moss, 1/3 compost, and 1/3 vermiculite. This mix is said to keep nutrient-rich forever and make your plants bloom amazingly. So there ya go, veggies. Nothing but the best for you.
Now this is where the pictures get sparse... Originally I was going to put down a grid of wood trim (as the grid is the most important part of square-foot gardening). However, I didn't take in to account that a 4 foot piece of trim, fitting across a 4 foot square, doesn't leave much room for attaching it to the edges. Dang. So now what's my plan B?
I remembered that I had an old water hose out behind the shed that dear old Rory had chewed a hole through. (jeez- what am I raising? such a destructive hellion!) So I thought to myself, what if I could re-purpose that old hose into a new watering system while at the same time using it to mark the square grid?? Holy cow! What a great idea, self!
So off I went to get the hose and connect it in a grid-like pattern on my flower bed. Here is the best picture of said grid (post-planting, like I said- sparse pictures at this point).
 I started with the hose in the back corner. I left the connector there so I could just connect my other hose whenever I wanted to water the veggies. I then used 2 nails on each side of the hose to help secure it along the sides of the bed where it "turned" to go in another direction. Then, once the entire grid was in place, I poked holes along the hose to make sure each "square" got some water spray- like a homemade drip system.
 I used the extra hose at the end to drape onto my fence/window boxes that are holding assorted herbs:
 After all plants were planted (according to a spacing guide found online- sorry, can't find the link now), I added the chicken wire and posts to (hopefully) keep the hellion at bay.
 After all plants were planted (according to a spacing guide found online- sorry, can't find the link now), I added the chicken wire and posts to (hopefully) keep the hellion at bay.
I planted Big Beef Tomatoes, Roma Tomatoes, Red Peppers, Sweet Banana Peppers and Jalapeno Peppers. In my herb baskets, I added Basil, Cilantro, Rosemary & Oregano.
Here are a few views from when they were planted in the spring:

 I also had a couple of extra plants, so I added them to these empty pots:
LOOK! After a few weeks, I already have some peppers and tomatoes!


UPDATE: It is now August (I never posted this in the Spring like I meant to) and those little tomatoes and peppers you see above are THE ONLY veggies I got all Spring! It might have something to do with the Texas temps jumping from 70 degrees to OMG IT'S FREAKIN HOT degrees within a couple weeks. I was told that once the temps go over 80, I won't get any new veggies, but to keep the plants alive all blistery summer and then come fall, I'll have so many tomatoes and peppers I won't know what to do with myself. So here's to hoping. I've been watering them constantly to keep them alive and well (as opposed to the rest of my yard which has turned into a desert).


 I am not a professional re-finisher (as I will prove when I show my chair re-do) so I know I didn't do this the correct way. I should have primed it first, and I probably should have done a clear coat or seal too. But I like to live on the edge. And by edge, I mean the edge of laziness mixed with "is this really necessary?"


 After they were laid out the way I like them, I traced them on to the paper. I was then left with these outlines:
 Is this angle better? I really should have used markers!
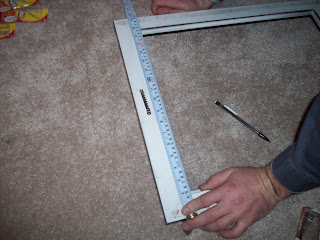
  After you measure the picture hangers and figure out where the nail holes go, just nail them right over the paper. Then hang the frames to make sure they lay directly over your original outline.
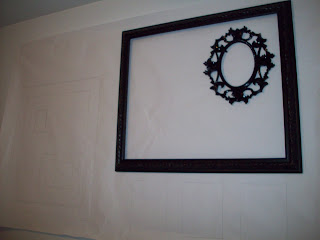 Once all your nail holes are done, you can remove the paper and put all the frames in place. Here is what my wall looked like halfway through, before I painted all the frames and added a few more.
 Here it is now. I still consider it a work in progress, as I can keep adding frames to fill the whole wall if I want. I really like adding the few little touches to the frames to make them more interesting.


